 |
| "They are all mine, don't even think....." |
The pattern is on sale in the Ravelry store at http://www.ravelry.com/patterns/library/all-in-one-piece
A few tips about the pattern.:
1. Make sure check the tension of stitches after a few rounds especially at start and end of the project. Sometimes, "artificial" help is required using a yarn needle and picking on stitches to evenly distribute the tension in the knitted rows (the knitted "V"s should be near to the same size). It is better to catch it early than to make amendment after the last row.
2. Markers are not totally essential unless you are knitting in DPNs. The markers I placed along the row are to give me visual clue to where I was. My two furballs always bug me while I am knitting :D, so the markers are helping me to pick up my knitting easy. They are also placed at the centre of each half round. So if I made mistake in my knitting, the lopsided will be easily spotted.
3. The k2tog decrease on the right side is not a typo mistake :p I tried ssk before for a few pieces and find the ssk stitches showed a very prominent ridge on the right side. I like a smoother finish, so turned back to k2tog on the right side decrease instead.
4. To do the BO, the tail should be around 3 - 4 times the length of the round to be bind off, so the length in the pattern is just a recommendation. It is probably more than needed, but always better to have more than less in the end. It is always difficult to attach yarn at this stage.
As for decoration (my favourite), I tried from simple to complicated. Simple as in no extra time involved as it is all inclusive in the knitting. Expected to spend half an hour or more for complicated one.
The simplest is to use variegated yarns and let them form bright and random beautiful patterns. It probably will show better in larger size piece as more yarn will be used in knitting a row. Combining it with complimentary / contrasting solid colour yarns, it is a easy way to make an eye pleasing bone for human :D
 |
| Solid red on half and variegated the other half |
The next step up will be classic simple colour stripes either using solid contrasting / complimentary colours alternating, variegated / solid colour alternating or different colours for each stripes( this will really use up the scrape yarns fast!). Remember it is a closed up sachet when finished, so attaching yarns with big solid knots will not affect the aesthetic of the piece. Everything hides "inside" (evil smile). With my pattern, there might be a little bit of problem doing that evenly in part of the condyles at both ends :(
 |
| Moo Moo is checking out the light blue stripes bone with catnip |
More complicated will be simple intarsia with contrasting colour makes a stunning piece. Unless the yarns you are using are very soft and compliable, I will recommend two colours only. The more colours used, the more twisting the yarns at the back will be, and thus the piece will be less stretchable and stuffing to obtain the shape might prove difficult.
 |
| CEO of 2 Cats Knitting Factory is checking out the grey and purple intarsia bone |
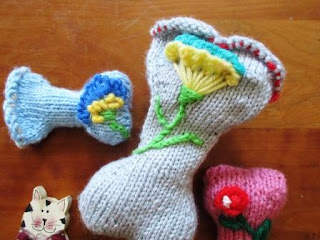
Most complicated and time consuming will be embroidery. Simple initials embroidery using yarn needle or crocket hook will not be that difficult (although I have not try one yet :p). Start with simple embroidery, like using duplicate stitch to make some polka dots or stars. Flower embroidery involves more complicated stitches. Also unlike thread embroidery, it is really impossible to draw the design on the fabric, though it might help to have the design on a piece of paper to follow. Embroidery makes the piece unique and beautiful. Check out YouTube for techniques and ideas.
 |
| Plain colour bones with flower embroidery |
Before ending my ranting :p, also pay attention in stuffing. This is a knitted piece, and unlike crochet one, it is more stretchable. It is easy to overstuffing. Our pets like us stinky :D, so unwashed old T shirts, etc., you are going to throw away, hold them back. Cut then into pieces and stuff into the bones. They will like it more. For kitties, a catnip pouch inside is a must.
This toy is good for your soft mouth companion. If your pets are chewers, I will not recommend it. Not that the hand made toy will disintegrate in seconds, they can also swallow or choke on it. So make sure the stuffing materials are non toxic and non expandable (after soaking up water). One of my furballs is a chewer meow meow. The fish or mice lose their tails, the strawsberry loses its hanging leaves, the sweet shrimps lose their tails on the sushi (facepalm). He chewed and swallowed, but at least he limited his intake (lol). Traces would show up the next day in his poo poo. Choose the right size toys for the size of your pets. Always supervised them while playing with toys to ensure safety. That will help with those hefty veterinarian bills and suffering of your best friends if they ever swallow the toy.
Finally enjoy the knitting, but if you do not have time to do it, I am always willing to knit the bones for you for a small price. Please leave me a message and address for private message. Thank you :)
No comments:
Post a Comment